Search This Blog

Showing posts with label self-portrait. Show all posts

Wednesday, May 4, 2016

Teaching Nonverbal and Less Verbal People - Adam paints a self portrait

"Live as if you were to die tomorrow. Learn as if you were to live forever." 
~ Mahatma Gandhi

Adam writes and draws about our portrait painting class

Adam is an intelligent young adult on the autism spectrum who is less verbal and uses drawing and other art forms for communication. I first met Adam when he was just 3 years old and profoundly nonverbal. My job as a speech-language pathologist was to help him learn to connect and communicate with the world around him. What actually happened over the next couple of decades was more interesting - as much as I taught him, he taught me more. So at this point, I'll say that together Adam and I have discovered some effective ways to get around the barrier of imperfect verbal communication and give voice to the intellect and creative soul within. With Adam's permission, we now share some of what we've learned.


In the Art Studio:

Portrait teaching setup (Adam's easel on the left, my instructional model on the right, iPad photo reference and painting materials in the center)

You need a space that is friendly and comfortable for the student. The art studio we are working in is one that Adam's dad set up for Adam and his mom (who is also learning to paint). We have a generous work surface so that materials can be visually set out in an organized way. There is room for Adam (a tall guy) to step back and move around. Also important to consider lighting (need to see clearly, but not aggravate sensory sensitivies), sound environment (reduce background noise) and air quality (allergies, eg. free from mold & mildew).


Below are links to the two instructional videos that we made from our recent portrait painting sessions (posted on our YouTube channel AUTISMartCOMMUNICATE). These videos highlight and demonstrate some effective teaching strategies when working with less verbal individuals, including:

  • use of visual demonstrations
  • working from visual models
  • effective use of the iPad as a visual tool (takes & displays photos, allows zooming in on specific details)
  • verbal language should be clear, slow-paced and match demonstrated actions
  • back up verbal language with visual supports (to improve comprehension)
  • allow time for processing of verbal questions and instructions
  • repetition and rephrasing (of key information) can be helpful
  • resist "chattering" (remind yourself to leave quiet spaces)
  • SHOW more than TELL
  • gentle "hand over hand" can sometimes be useful when teaching a new motor skill
  • simplify language without "talking down"
  • allow the student to work at their own pace (don't rush)
  • student should be mostly calm, relaxed and enjoying the experience
  • okay for students to talk to themselves as they work
  • specific to portrait painting, be aware that autism can affect the individual's ability to process the human face
  • balance direct instruction with developing the student's artistic expression & style
  • art activities are a good context for language learning 
  • assume competence (and that all of your words are received and understood)


Part 1 (from the first hour-long painting session):


(if the video won't play click this link: Adam paints a self portrait - part 1 )

And Part 2 (from our second one-hour portrait painting session):


(if the video won't play click this link: Adam paints a self portrait - part 2 )


We hope you find these videos helpful and that you try out some of the methods in your own classes and studios. There is a lot of untapped artistic potential in the autism population, and many new artists waiting to learn new ways to express themselves. We would love to hear about your experiences.


We'll end this post by sharing Adam's completed self portrait. He has a bold and expressive artistic style that comes through in all of his art work, and is all his own. I love it:

Self Portrait by the artist, Adam V

Thursday, June 12, 2014

Art Lessons for Less Verbal People: painting self-portraits

 
~ this post is dedicated to (and prompted by) Raymond, Kevin's brother and #1 art fan, who reminded me that lately I've been neglecting the blog ~


This has been a very creative spring for Kevin and Adam. I've been wanting to share what we've been up to, but have been so busy doing art that there's been little time left over to write about our artistic ventures and adventures. In keeping with the creative mindset, we're not going to worry about timeline, and lessons will not be presented chronologically, but instead will be ordered by the whims of my right brain.


Note: when teaching art to students (of any age) who are less verbal, it's important to show more than tell. I use a technique I call "Follow Me" (modified from teaching strategies described in Mona Brooke's excellent book "Drawing with Children") to introduce new art media and techniques. For more on this method, take a look at this video from our YouTube channel:


And so, we start at the most recent project, self-portraits.


According to my art teacher (at the Ottawa School of Art), one reason for starting portrait painting with a self-portrait is that the face is very familiar to you. Often artists will create complicated set-ups of easels and mirrors to make it possible to paint on a canvas and refer to the "live model in the mirror" without moving around. We simplified this process (and eliminated the need to stay in one spot) by using the "mirror photo" function on the iPad.

Here's Kevin's iPad photo that he used as a model (we set up our photo so that the source of light was clearly from one side, to simplify the light and shadow):


Next step was to have Kevin do a spontaneous drawing of himself from the photo. When he did this, he made himself in "cartoon" form (which is how he frequently draws himself and family members in our language exercises):


For the next step, Kevin and I drew a side-by-side "guided" drawing, where I brought Kevin's attention to the lines, contours and shadows on the actual photo of his face. This is the "planning" drawing he produced:


Then we started in with paint on canvas. Following the method of my own painting teacher, we made a "paint sketch" with yellow ochre (no pencil lines to paint over later). Then we blocked in the shapes of skin, hair, shirt and background, as well as the areas of light and shadow. By the end of our first session, this is what Kevin's painting looked like:


You can still see some of the yellow ochre sketch lines around the eyes, eyebrows and mouth. With acrylic paints, it takes more than one layer to get vivid colours - this project was the first time that Kevin left a painting incomplete with a plan to finish it the next week (we made this clear before we started painting, so that he was prepared to leave it half-done - another important art lesson tip is "no surprises").

The next week, we added more layers of paint, more details, more light and shadow. And here's the completed self-portrait that Kevin painted (I love the personality that comes through in this painting!):


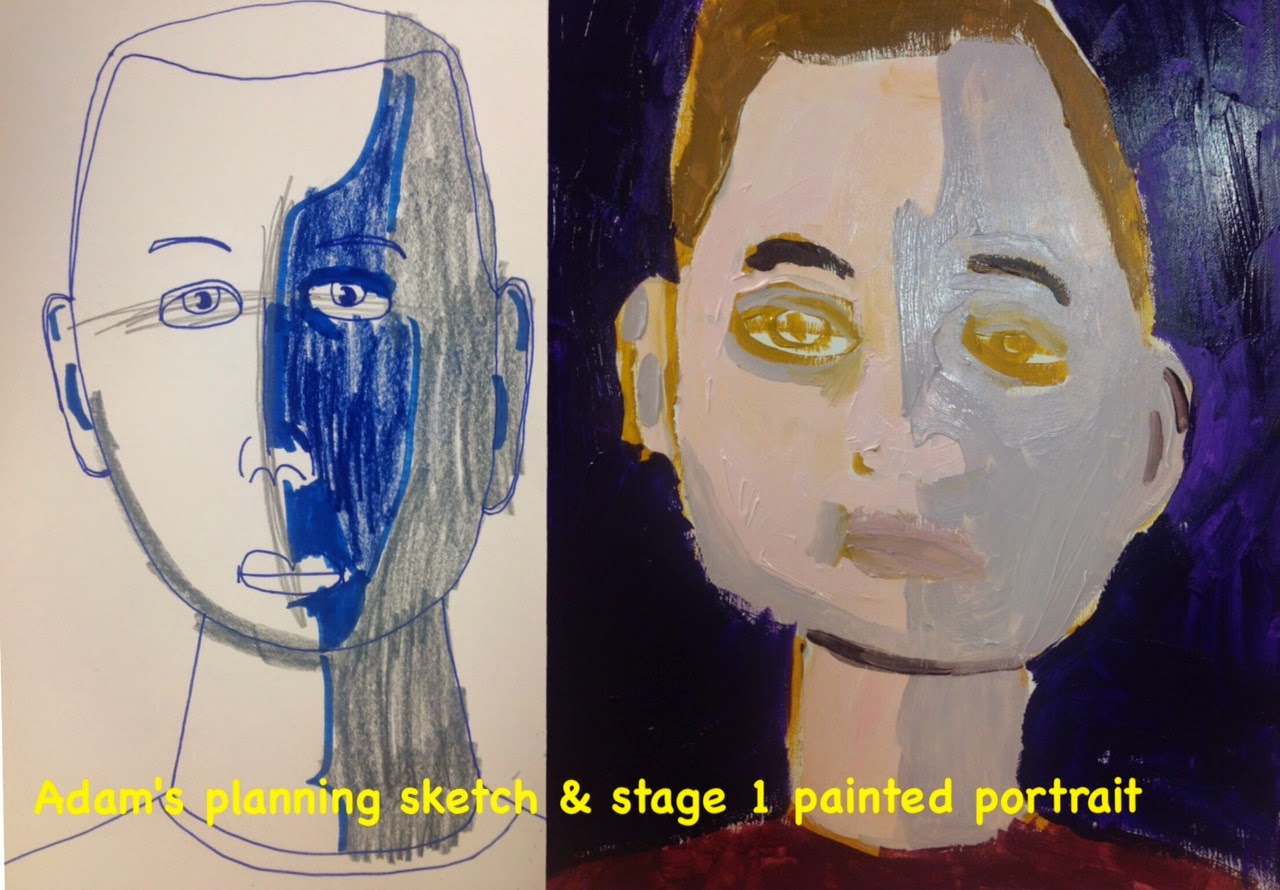
Adam was involved with some Picasso lessons (more on that in a later post), and so did his self-portrait later in the spring than Kevin. Here are the stages of Adam's self-portrait, and you'll see that although the teaching method was the same, Adam's style and personality results in a different type of finished painting:


One final note:
 
always very interesting to me how my "model" drawings and paintings are somewhat mechanical and bland, but the drawings and paintings produced by my students have personality and quirkiness and life to them ...
I'm giving "visual instructions" and they're expressing themselves with art ... so cool
 
 
Stay tuned for more lessons (how am I doing Raymond?)
......... Sheila B